Bisquick Chicken Pot Pie: A Classic Comfort Food Made Easy
Have you ever craved the warm, comforting embrace of a homemade chicken pot pie but felt intimidated by the thought of making one from scratch? What if I told you that creating a delicious bisquick chicken pot pie could be both simple and satisfying, even on your busiest weeknights?
This beloved American classic combines tender chicken, colorful vegetables, and a creamy sauce, all topped with a golden Bisquick crust that bakes to perfection. The beauty of a bisquick chicken pot pie lies in its simplicity – it delivers all the comfort of traditional pot pie without the fuss of making pastry from scratch.
Ingredients List
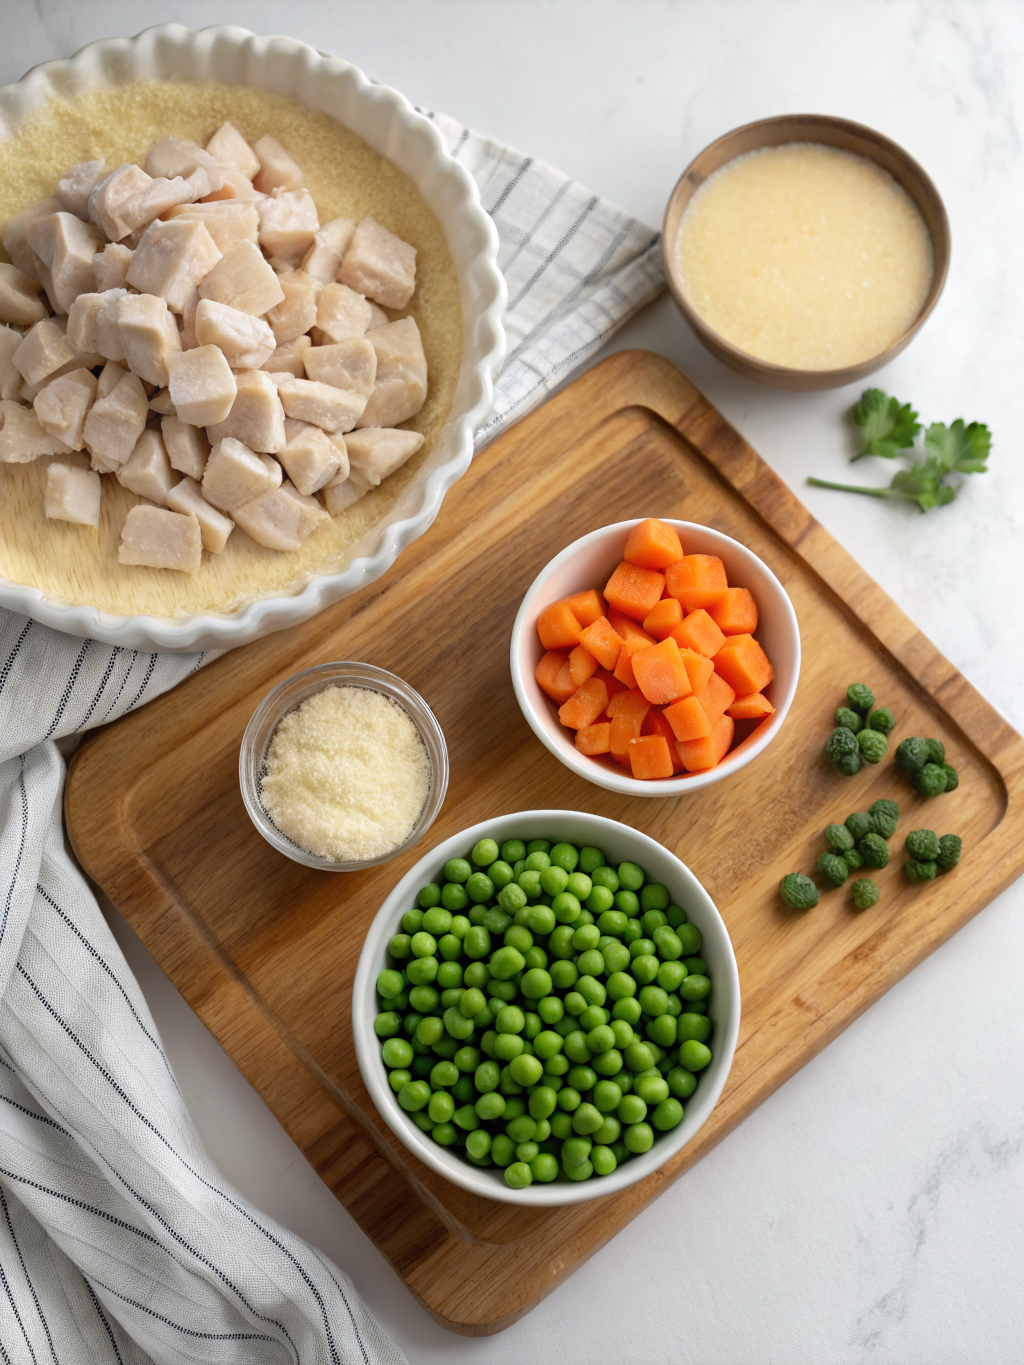
Gathering quality ingredients is the first step to creating a memorable bisquick chicken pot pie. Each component contributes to the rich, savory experience that makes this dish a family favorite.
- 2 cups cooked chicken, shredded or cubed (rotisserie chicken works wonderfully)
- 1 can (10.5 oz) condensed cream of chicken soup
- 1 cup frozen mixed vegetables (peas, carrots, corn, green beans)
- 1/2 cup milk
- 1/4 teaspoon dried thyme
- 1/4 teaspoon black pepper
- 1/2 teaspoon salt
- 1 small onion, finely diced
- 1 clove garlic, minced
- 1 tablespoon olive oil
- 1 cup Bisquick baking mix
- 1/2 cup milk (for the topping)
- 1 egg
- 1/4 cup grated parmesan cheese (optional)
Substitution Ideas: No Bisquick on hand? Make your own by combining 1 cup flour, 1 1/2 teaspoons baking powder, 1/4 teaspoon salt, and 1 tablespoon butter. For a dairy-free version, substitute the milk with unsweetened almond milk or chicken broth.
Timing
Understanding the time commitment helps you plan your meal preparation efficiently. This bisquick chicken pot pie comes together faster than traditional versions, making it perfect for weeknight dinners.
Preparation Time: 15 minutes (30% less than traditional pot pie recipes)
Cooking Time: 30 minutes
Total Time: 45 minutes
This streamlined recipe saves you nearly an hour compared to making a pot pie with homemade crust, without sacrificing that comforting, home-cooked flavor your family craves.
Step-by-Step Instructions
Follow these detailed instructions to create a perfect pot pie every time. Each step builds flavor and ensures your dish turns out just right.
Step 1: Prepare Your Ingredients
Preheat your oven to 375°F (190°C). Ensure all ingredients are measured and ready. If using raw chicken, cook and cube it beforehand. If using frozen vegetables, there’s no need to thaw them – they’ll cook perfectly in the oven.
Step 2: Create the Filling Base
Heat olive oil in a large skillet over medium heat. Add diced onions and cook until translucent, about 3-4 minutes. Add minced garlic and cook for another 30 seconds until fragrant. This aromatic base will infuse your filling with depth of flavor.
Step 3: Combine Filling Ingredients
Add cooked chicken, frozen vegetables, cream of chicken soup, 1/2 cup milk, thyme, salt, and pepper to the skillet. Stir until well combined and heated through, about 5 minutes. The mixture should be creamy but not too runny.
Step 4: Transfer to Baking Dish
Pour the hot filling into a 9-inch pie plate or a 2-quart baking dish. Spread evenly to create a level surface for your Bisquick topping. A slightly deeper dish works better than a shallow one to prevent overflow during baking.
Step 5: Prepare the Bisquick Topping
In a medium bowl, whisk together the Bisquick, 1/2 cup milk, and egg until smooth. If using, fold in the grated parmesan cheese for extra flavor. The consistency should be similar to thick pancake batter – pourable but not runny.
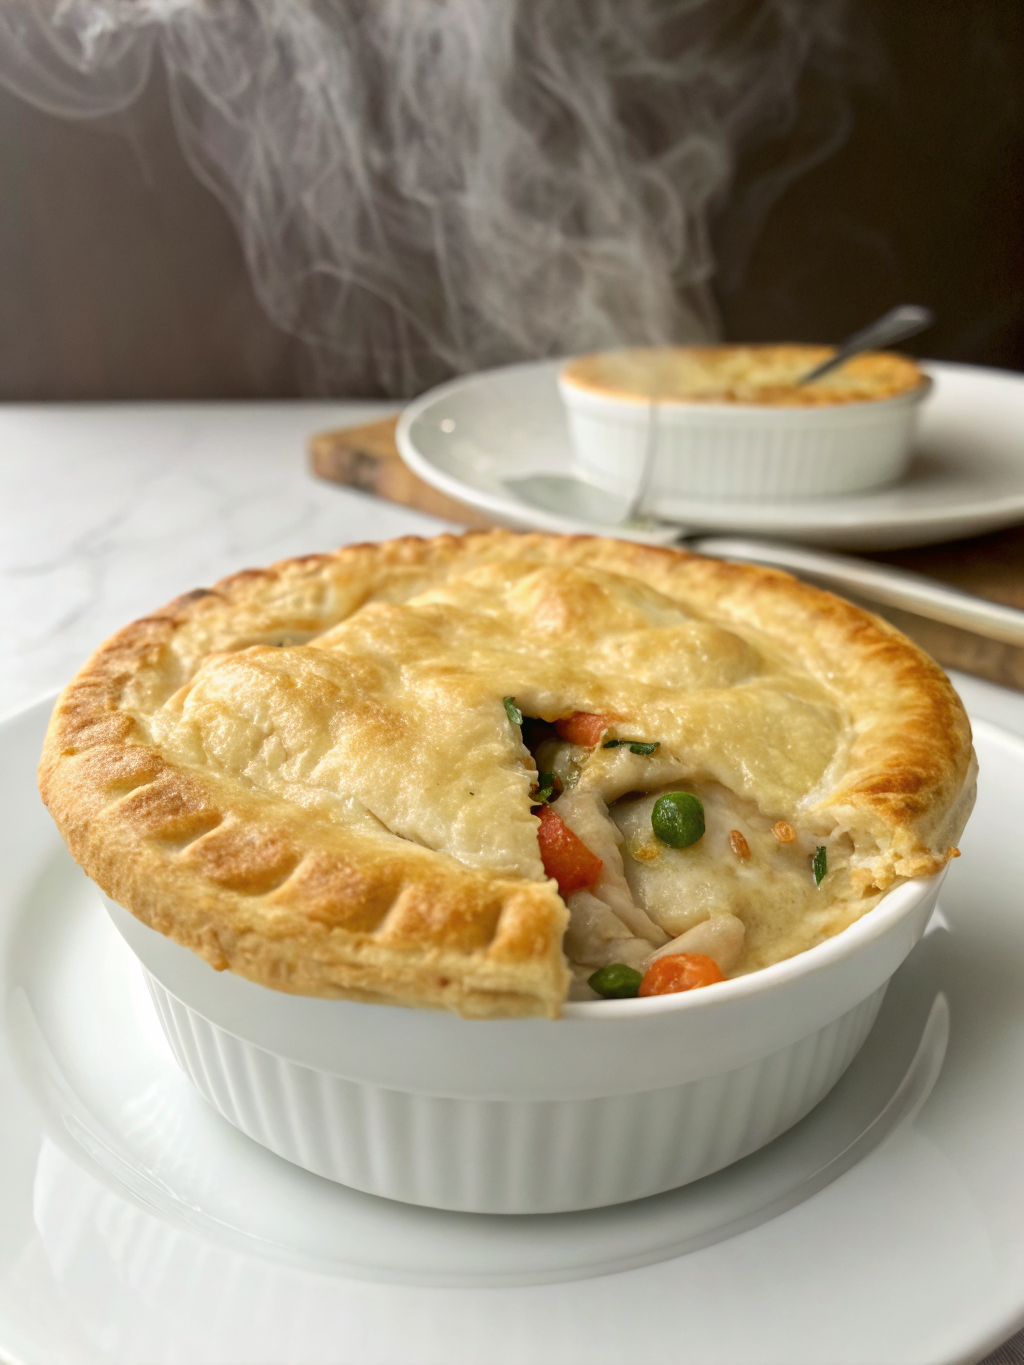
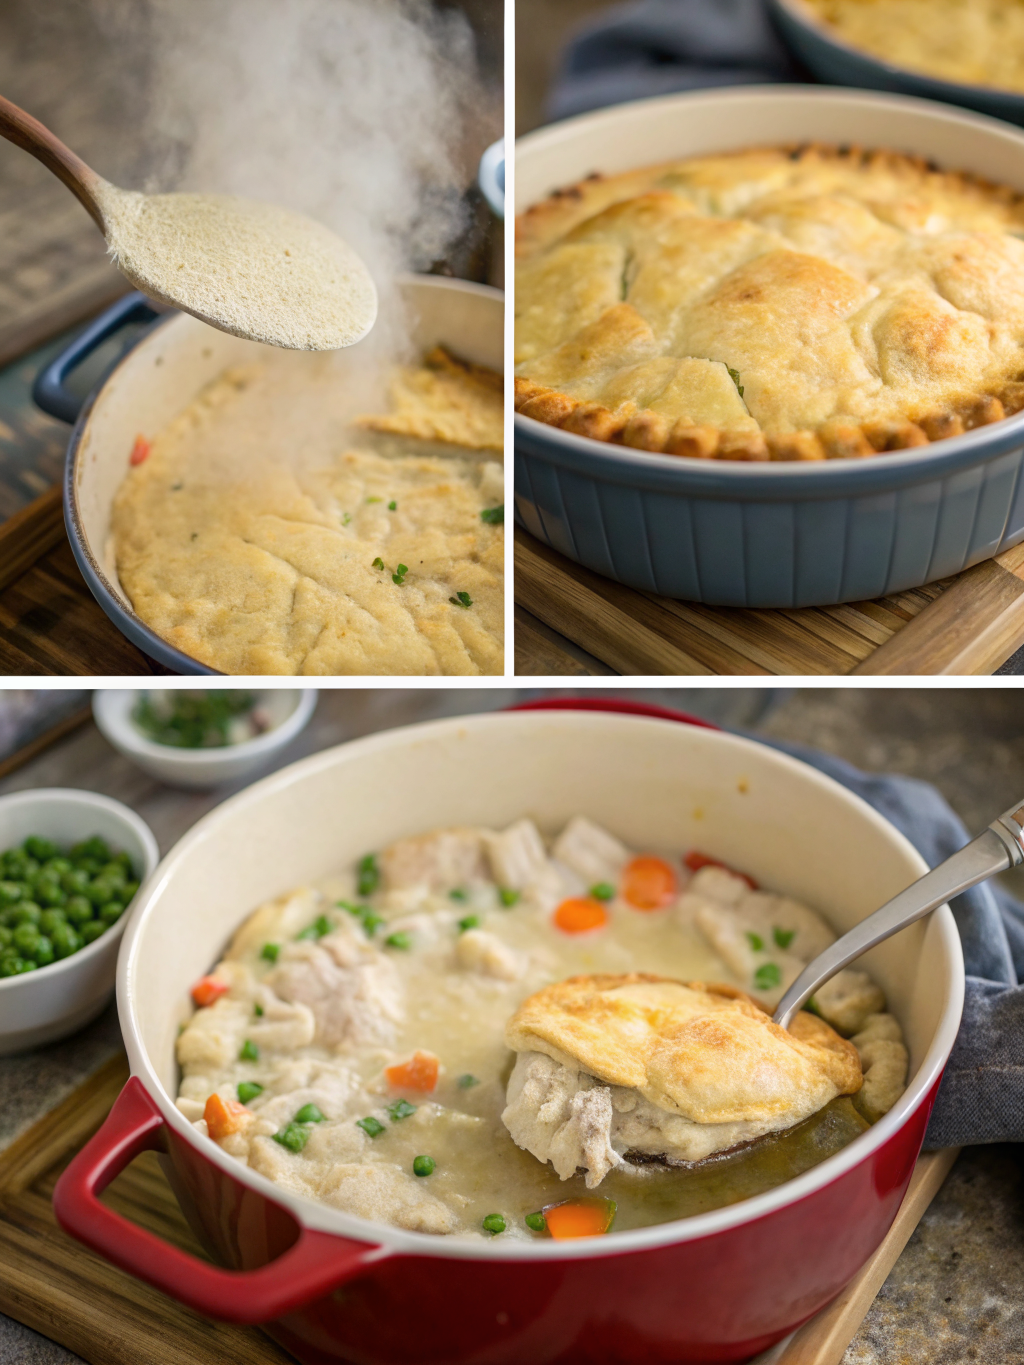
Step 6: Add Topping and Bake
Pour the Bisquick mixture evenly over the filling, spreading gently to cover the surface completely. Avoid stirring it into the filling – the distinct layers create the perfect pot pie experience. Bake uncovered for 25-30 minutes, until the top is golden brown and the filling is bubbling around the edges.
Step 7: Rest Before Serving
Allow your pot pie to rest for 5-10 minutes before serving. This crucial step lets the filling set slightly, making it easier to serve and preventing burnt tongues! The topping will continue to crisp up during this time.
Nutritional Information
Understanding the nutritional content helps you make informed choices about portion sizes and frequency. This homestyle favorite provides a balance of protein, carbohydrates, and vegetables.
Per serving (based on 6 servings):
Calories: 320
Protein: 19g
Carbohydrates: 28g
Fat: 15g
Fiber: 2g
Sodium: 890mg
Sugar: 5g
This pot pie provides approximately 25% of your daily protein needs and contains vitamins A and C from the vegetable medley. The sodium content is moderate compared to store-bought frozen pot pies, which can contain up to 1,200mg per serving.
Healthier Alternatives for the Recipe
With a few thoughtful modifications, you can adjust this classic to suit various dietary preferences while maintaining its comforting appeal.
For a lighter version, use low-fat milk and reduced-sodium soup. You can increase the vegetable content by adding an extra 1/2 cup of vegetables and reducing the chicken to 1 1/2 cups. For a whole-grain boost, use whole wheat Bisquick or make your own topping with whole wheat flour.
To reduce carbohydrates, consider using a cauliflower-based topping. Simply rice 2 cups of cauliflower and mix with 1/2 cup Bisquick, 1/4 cup milk, and one egg. This modification reduces the carbohydrate content by approximately 40% per serving.
Serving Suggestions
Elevate your pot pie experience with these complementary side dishes and presentation ideas that transform this humble comfort food into a memorable meal.
Serve alongside a crisp green salad dressed with a light vinaigrette to balance the richness of the pot pie. For a complete comfort food experience, pair with cranberry sauce or a small portion of mashed sweet potatoes.
For special occasions, consider serving individual portions in ramekins – this creates an elegant presentation and helps with portion control. Garnish with fresh thyme leaves or a light sprinkle of paprika for a professional touch that enhances both appearance and flavor.
Common Mistakes to Avoid
Even experienced cooks can encounter challenges with pot pies. Being aware of these potential pitfalls will help ensure your dish turns out perfectly every time.
- Overfilling the baking dish: Leave at least 1/2 inch of space below the rim to prevent bubbling over during baking.
- Making the filling too thin: If your filling looks watery, simmer it longer to reduce excess liquid, or add 1 tablespoon of flour to thicken.
- Undercooking the vegetables: While the pot pie bakes, the vegetables continue cooking. However, if using fresh instead of frozen vegetables, consider blanching them briefly first.
- Skipping the resting period: Serving immediately after baking results in a runny filling. The 5-10 minute rest is essential for proper consistency.
- Overworking the Bisquick mixture: Mix just until combined – overmixing can create a tough rather than tender topping.
Storing Tips for the Recipe
Proper storage extends the enjoyment of your pot pie and can make meal planning easier. Follow these guidelines for the best results.
Refrigerate leftover pot pie within two hours of cooking, covered with foil or in an airtight container. It will keep well for 3-4 days. For best results when reheating, use an oven preheated to 350°F for 15-20 minutes rather than a microwave, which can make the topping soggy.
This dish also freezes beautifully. For best results, freeze before baking – prepare the filling and transfer to a freezer-safe dish, then top with the Bisquick mixture. Cover tightly with foil and freeze for up to 3 months. When ready to enjoy, bake from frozen at 375°F for 45-50 minutes until golden and bubbling.
Easy Homemade Chicken Pot Pie Recipe with Cream of Chicken Soup
Conclusion
The humble Bisquick chicken pot pie proves that comfort food doesn’t have to be complicated or time-consuming. With simple ingredients, straightforward preparation, and endless possibilities for customization, this recipe deserves a regular spot in your meal rotation.
Have you tried making this classic comfort dish? I’d love to hear about your experience or any special touches you added to make it your own! Share your results in the comments below, or tag us in your social media posts. And if you enjoyed this recipe, be sure to check out our other quick comfort food classics that bring warmth to busy weeknights.