Chicken Stock Recipe: How to Make Rich and Flavorful Stock at Home
Have you ever wondered why restaurant soups and sauces taste so much more complex and flavorful than homemade versions? The secret isn’t exotic ingredients or culinary school techniques—it’s simply starting with a proper homemade chicken stock recipe!
Making your own chicken stock is one of the most transformative skills you can master in the kitchen. This easy chicken stock recipe turns kitchen scraps and simple ingredients into liquid gold that will elevate everything from soups to risottos.
Unlike store-bought versions loaded with sodium and preservatives, homemade stock delivers clean, authentic flavor while giving you complete control over ingredients. Let’s dive into this essential culinary building block that professional chefs consider non-negotiable.
Ingredients List
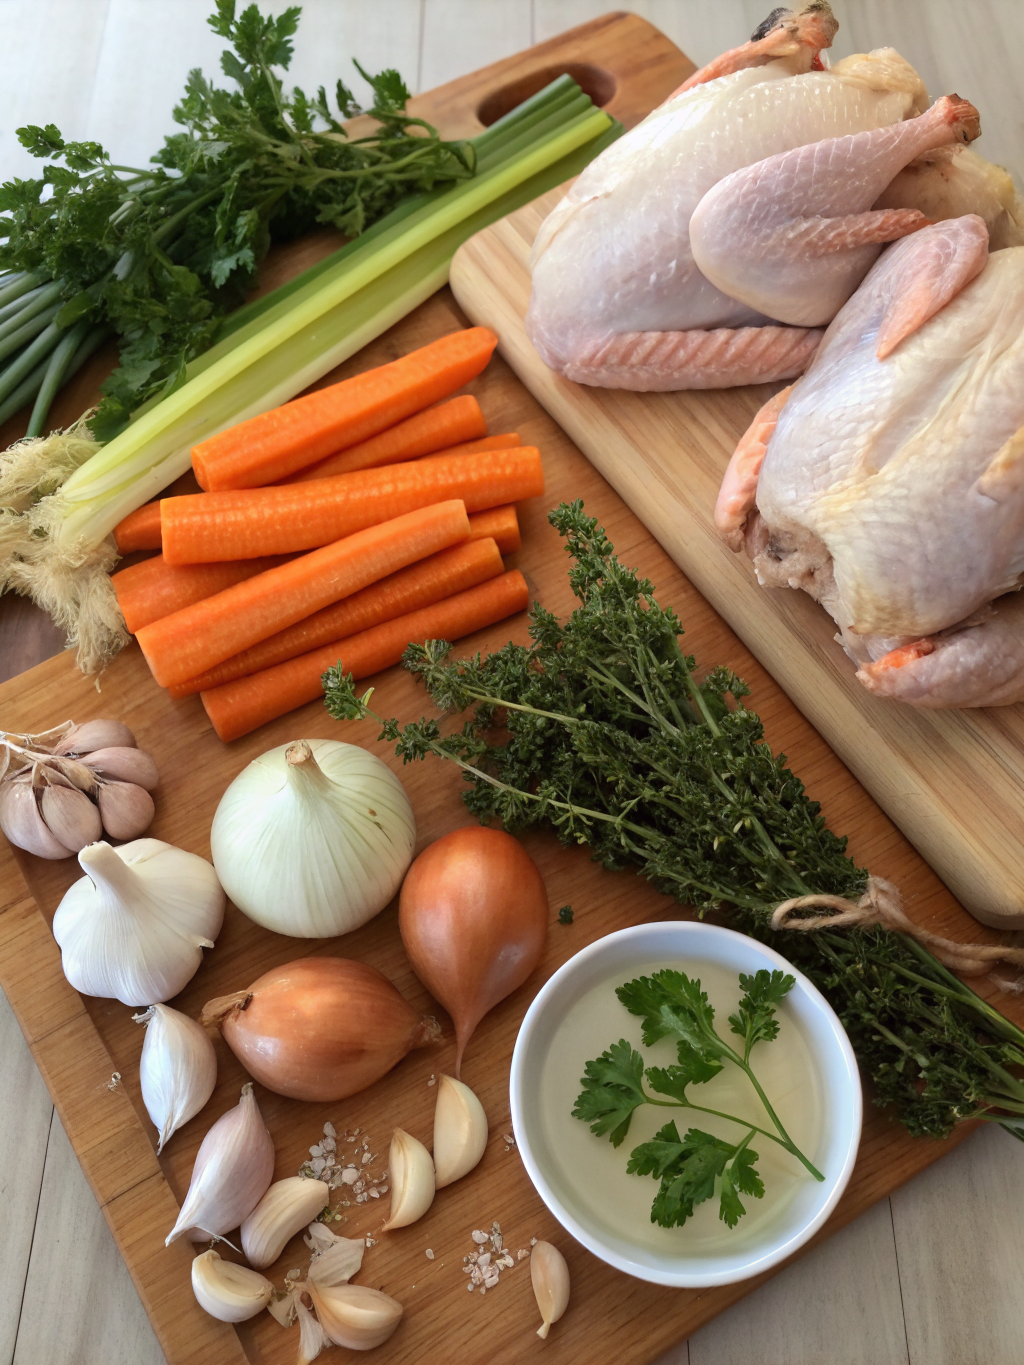
- 2-3 pounds chicken bones (carcass from a roasted chicken, backs, necks, or wings) – Save bones from rotisserie chickens or ask your butcher for chicken backs
- 1 large onion, roughly chopped (no need to peel if organic)
- 2 carrots, roughly chopped
- 2 celery stalks, roughly chopped
- 2 bay leaves
- 1 tablespoon black peppercorns
- 6-8 sprigs fresh parsley (or 1 tablespoon dried)
- 6-8 sprigs fresh thyme (or 1 teaspoon dried)
- 1 tablespoon apple cider vinegar (helps extract minerals from bones)
- Cold water, enough to cover ingredients by 1 inch (approximately 3-4 quarts)
- Salt (optional – many chefs prefer to add salt when using the stock in recipes)
For vegetable substitutions, feel free to use leeks instead of onions, parsnips instead of carrots, or add mushroom stems for an umami boost. The beauty of a chicken stock recipe is its flexibility!
Timing
Preparation time: 15 minutes to gather and chop ingredients
- Cooking time: 3-4 hours for regular stock, up to 12 hours for bone broth (longer cooking extracts more collagen and minerals)
- Total time: Approximately 4 hours, which is significantly less active cooking time than most people assume – the majority is hands-off simmering!
- Pro tip: Make a large batch on a weekend afternoon when you’re home doing other things. The effort-to-reward ratio makes this one of the most efficient recipes in your repertoire.
Step-by-Step Instructions
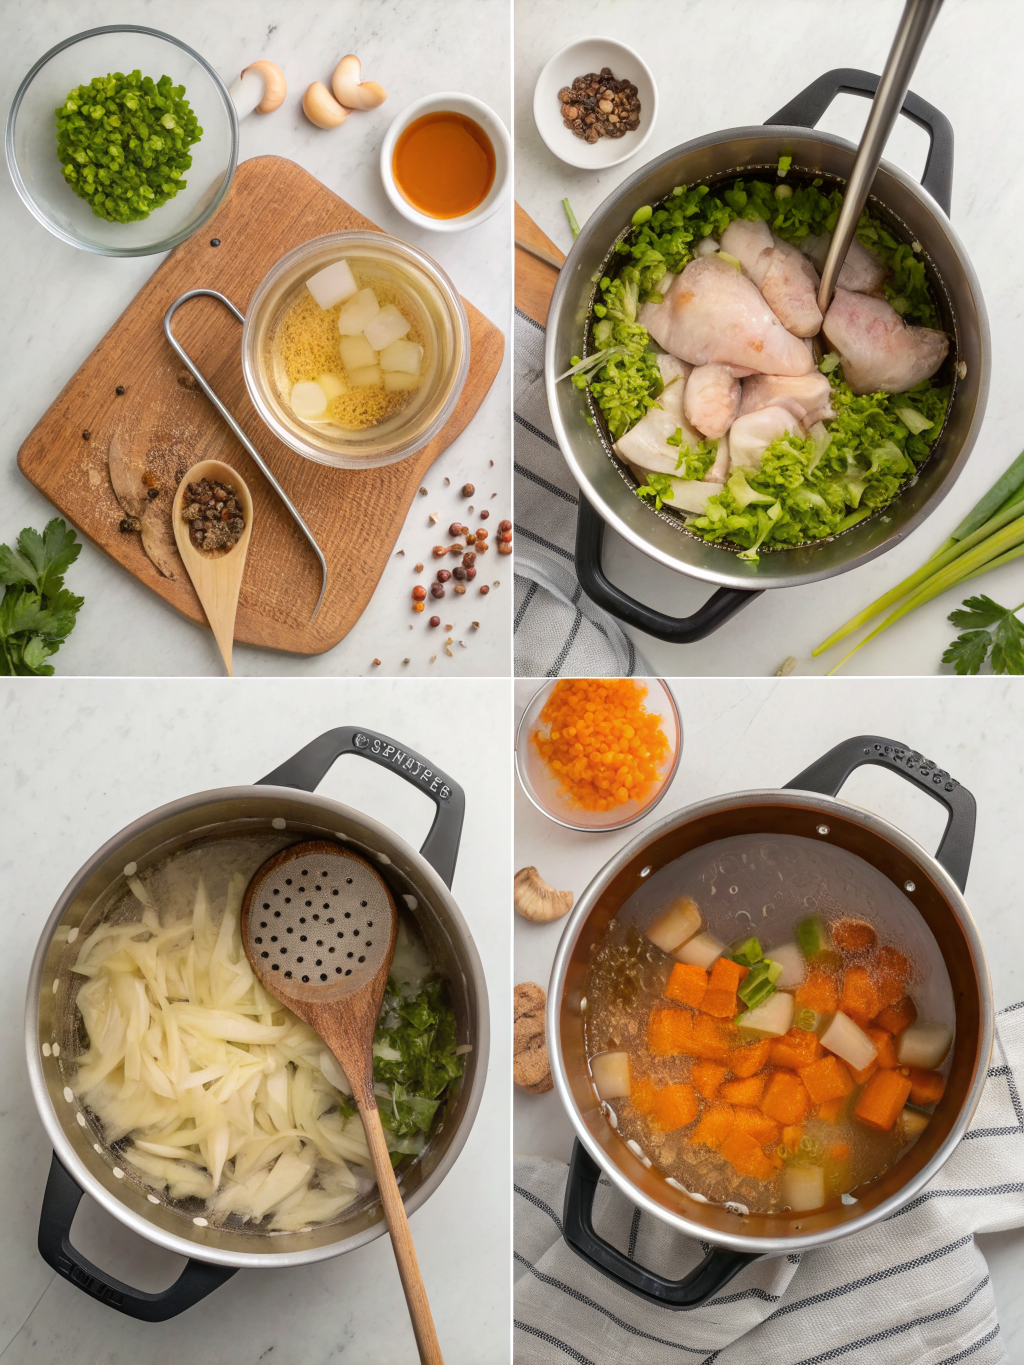
Step 1: Prepare Your Ingredients
Gather all your ingredients and roughly chop the vegetables. There’s no need for precise cutting since everything will be strained out later. If using a whole chicken carcass, break it down into smaller pieces to fit your pot and release more flavor.
Step 2: Roast Bones (Optional but Recommended)
For deeper flavor, place the chicken bones on a baking sheet and roast at 400°F (200°C) for 20-30 minutes until golden brown. This step creates a richer, more complex stock through caramelization. Skip this step if using bones from an already roasted chicken.
Step 3: Combine Everything in a Large Pot
Place the chicken bones, vegetables, herbs, peppercorns, and apple cider vinegar in a large stockpot. Add cold water until everything is covered by about an inch. Starting with cold water helps extract more flavor and nutrients gradually.
Step 4: Bring to a Simmer
Place the pot over medium-high heat and bring to a simmer. As soon as bubbles start to appear, reduce heat to low. Never boil your stock vigorously as this will create cloudy results with a less refined flavor.
Step 5: Skim and Simmer
During the first 30 minutes, use a spoon or ladle to skim off any foam or impurities that rise to the surface. This step ensures a cleaner, clearer stock. Then simmer gently, uncovered or with the lid slightly ajar, for 3-4 hours.
Step 6: Strain the Stock
Line a colander with cheesecloth (or use a fine-mesh strainer) and place over a large bowl. Carefully pour the stock through to remove all solids. For ultra-clear stock, strain a second time through a coffee filter.
Step 7: Cool Properly
Never place hot stock directly in the refrigerator as this can raise the temperature of your fridge dangerously. Instead, place the bowl of strained stock in an ice bath, stirring occasionally until cooled to room temperature.
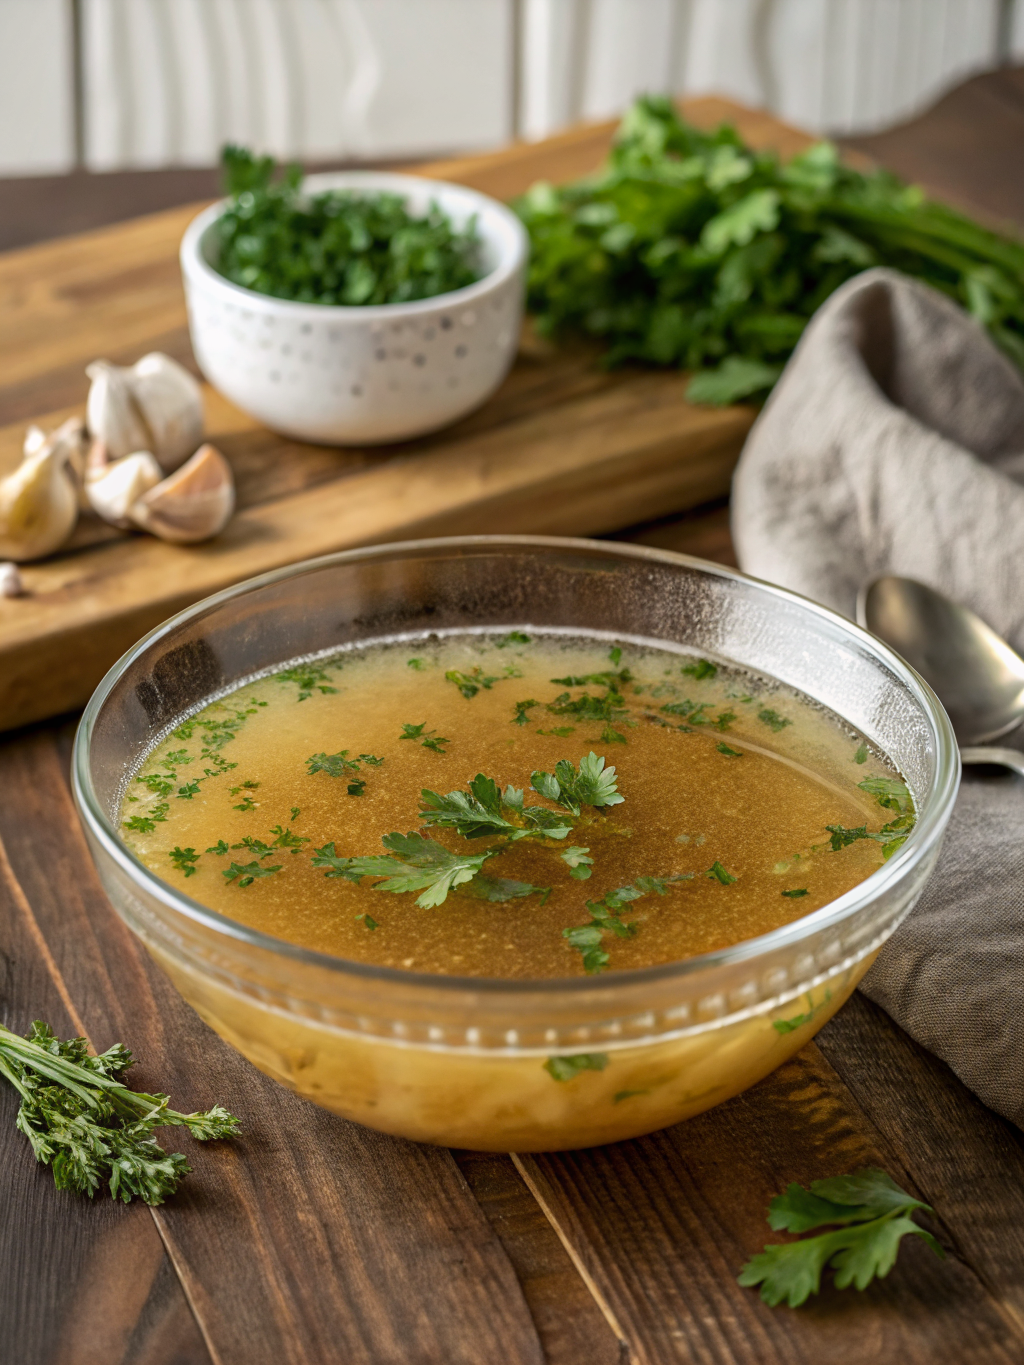
Nutritional Information
A cup of homemade chicken stock typically contains:
- Calories: 40-50 kcal
- Protein: 5-6g
- Fat: 2-3g
- Carbohydrates: 1-2g
- Sodium: 350mg (varies based on whether salt is added)
- Collagen: Significant amounts, especially with longer cooking times
Homemade stock contains approximately 60% less sodium than most commercial broths while delivering more protein and beneficial compounds like glycine and proline that support joint health and digestion.
Healthier Alternatives for the Recipe
For a lower-fat version, make your stock a day ahead and refrigerate overnight. The fat will solidify on top, allowing you to easily remove it before using. This technique reduces fat content by up to 80% while preserving flavor.
For those monitoring sodium, skip adding salt to the base stock and instead season individual dishes as needed. This gives you precise control over sodium levels in your final recipes.
Boost the nutritional profile by adding immune-supporting ingredients like fresh ginger, turmeric root, or garlic cloves during the last hour of simmering. These additions create a functional food that supports wellness while enhancing flavor.
Serving Suggestions
Use your homemade chicken stock recipe as the foundation for countless dishes:
• Substitute for water when cooking grains like rice or quinoa for an instant flavor boost
• Create restaurant-quality risotto with minimal additional seasoning needed
• Use as a poaching liquid for chicken breasts to keep them moist and flavorful
• Reduce by half with a splash of white wine for an instant pan sauce
• Sip warm with a pinch of sea salt as a nourishing alternative to tea when feeling under the weather
For an elegant dinner party starter, serve consommé (clarified stock) in warmed teacups with a small garnish of fresh herbs and a few drops of sherry.
Common Mistakes to Avoid
- Boiling instead of simmering: Vigorous boiling creates cloudy stock and can give a “boiled” taste. Always maintain a gentle simmer with just occasional bubbles.
- Overcrowding the pot: Using too many ingredients relative to water prevents proper extraction and circulation. Ensure everything is covered with at least an inch of water.
- Adding too many strong vegetables: Ingredients like cabbage, Brussels sprouts, or turnips can overpower the delicate chicken flavor. Stick to the classic mirepoix (onions, carrots, celery).
- Not skimming the surface: The foam that rises contains impurities that can cloud your stock and affect flavor. Take the time to skim regularly during the first 30 minutes.
- Rushing the process: Stock needs time to develop depth. The difference between a 1-hour and 3-hour stock is remarkable in terms of body and complexity.
Storing Tips for the Recipe
Refrigerate cooled stock in airtight containers for up to 5 days. For longer storage, freeze stock in useful portions to maximize versatility. Consider these freezing methods:
- Ice cube trays: Perfect for when recipes need just a tablespoon or two
- 1-cup containers: Ideal for individual portions of soup or cooking grains
- Quart containers: Best for family-sized soup bases
- Freezer bags: Lay flat to freeze, then store vertically to save space
Label all containers with the date and consider noting the batch (e.g., “roasted bones” or “with ginger”) to help you track your preferred variations. Frozen stock maintains optimal quality for up to 6 months.
Conclusion
Mastering this homemade chicken stock recipe is truly a game-changer for your cooking. The depth of flavor and versatility it provides will transform even the simplest dishes into something special. Plus, you’ll be reducing food waste by using chicken parts that might otherwise be discarded.
Have you tried making your own chicken stock? I’d love to hear about your experiences, favorite uses, or special ingredients you add to make it your own! Share your stock-making stories in the comments below, and don’t forget to bookmark this recipe for your next cooking session. Your soups, sauces, and taste buds will thank you!